My conversations
In eKool messaging, anyone can initiate chats or send messages to those eKool users they are allowed to chat with. This article provides instructions on how to start a new chat in the browser, in the main eKool application, in the eKool app (if the user has the role of student or parent) and in the eKool Communication app (all roles). How to add and manage messages in the chat will be reviewed also.
Web
Adding a new conversation or announcement
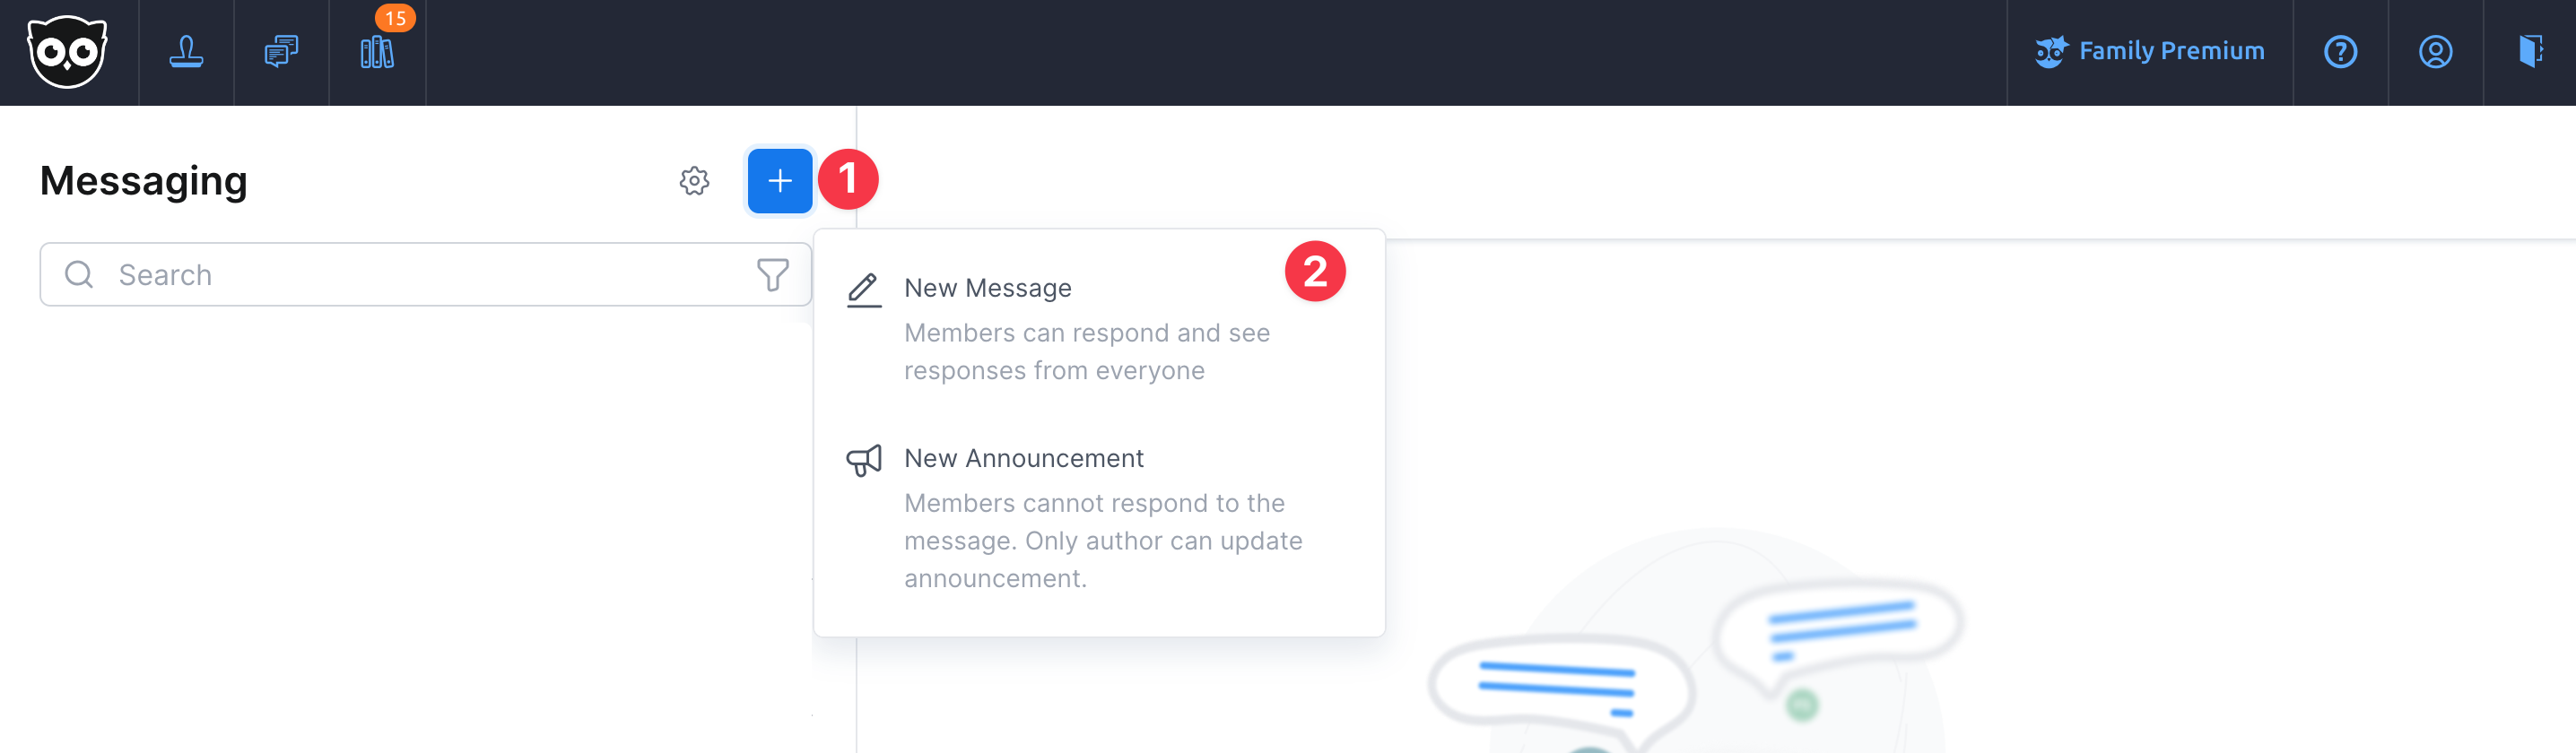
- Start a new conversation or announcement by pressing the + (plus) sign above the list of conversations.
- Select the type of conversation - new conversation; new announcement.
- The form for selecting the addressees of the conversation opens.
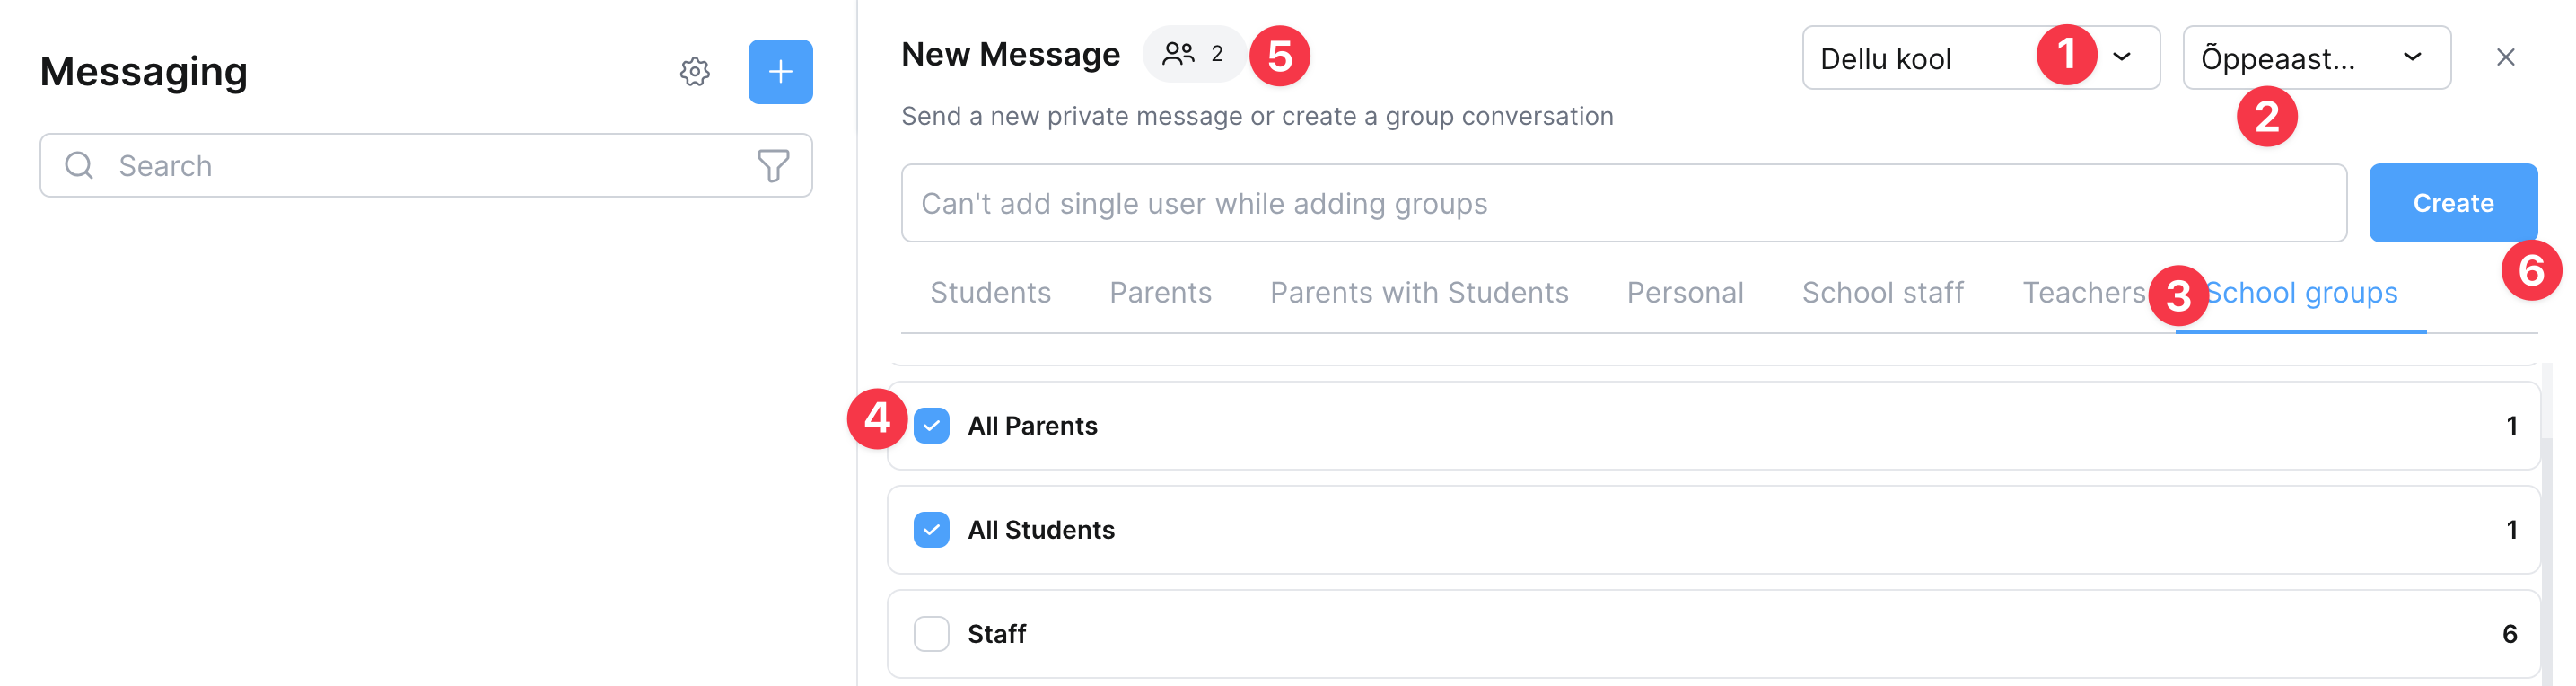
- Select school (if the user attends more than one school; the user's children attend more than one school or the user works in more than one school).
- Select the school year (the labelling depends on the school you have selected). The currently valid school year is always selected. The choice of the school year is only necessary if you want to open conversations with recipients who were contacted in previous school years.
- Choose how you want to find the recipients (For more information, see the article - “Contacts in conversations ”Contacts in messaging"):
- select from the groups Students, Parents, School staff, Teachers, Personal if you want to make a selection by name (to see who is participating in the chat when making a selection) and search for users.
- Select School Groups to start a conversation with role-based, automatically managed groups. The options vary depending on the role.
- Make a selection from the list of groups for one or more recipients.
- You can see the number of groups you have selected (if you have selected school groups) or the number of recipients (if you have selected from groups) at the top of the form.
- To add new conversation information, click Create.
Good to know!
Only students/parents who have an eKool account will be in the chat contacts!
The next step opens a form to add information to your conversation or announcement to make it easier to find.
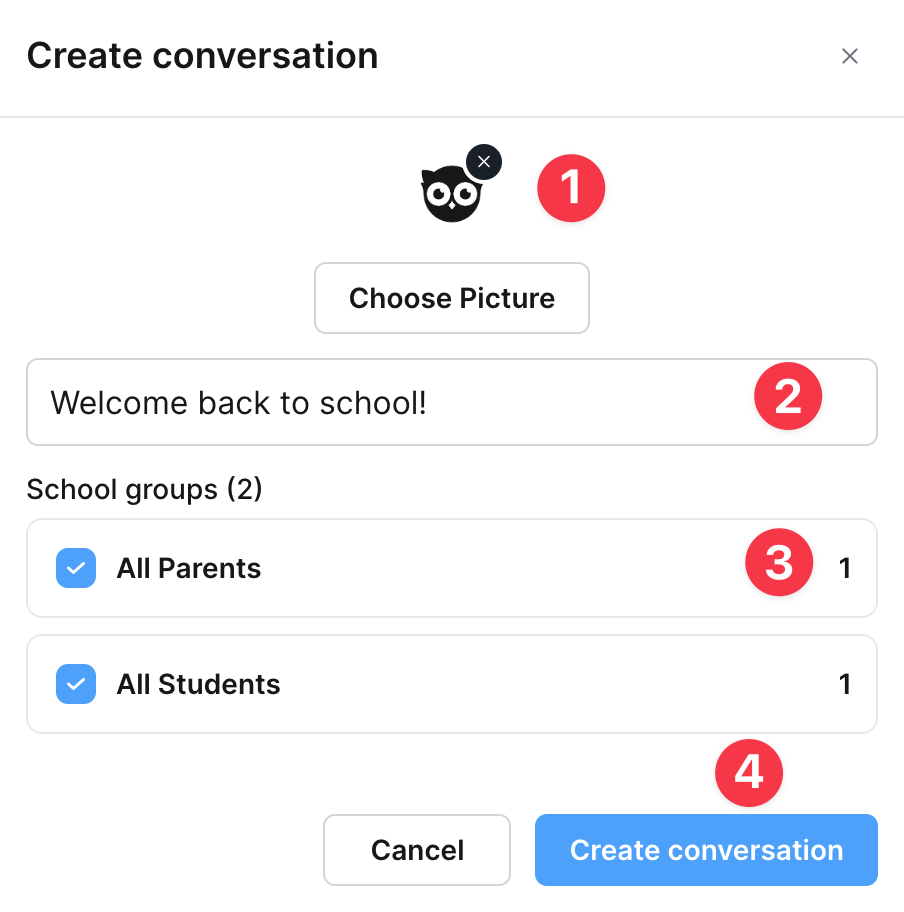
- Add a (representative) picture to the conversation (if you wish).
- Add the title of the conversation (required). The title must not exceed 50 characters.
- It is also possible to change the selection of participants, to exclude some people or groups from the conversation. There is no more possibility to add participants.
- Select Create conversation to add a new conversation
A blank chat form opens, where you can enter your first message.

Managing your conversations
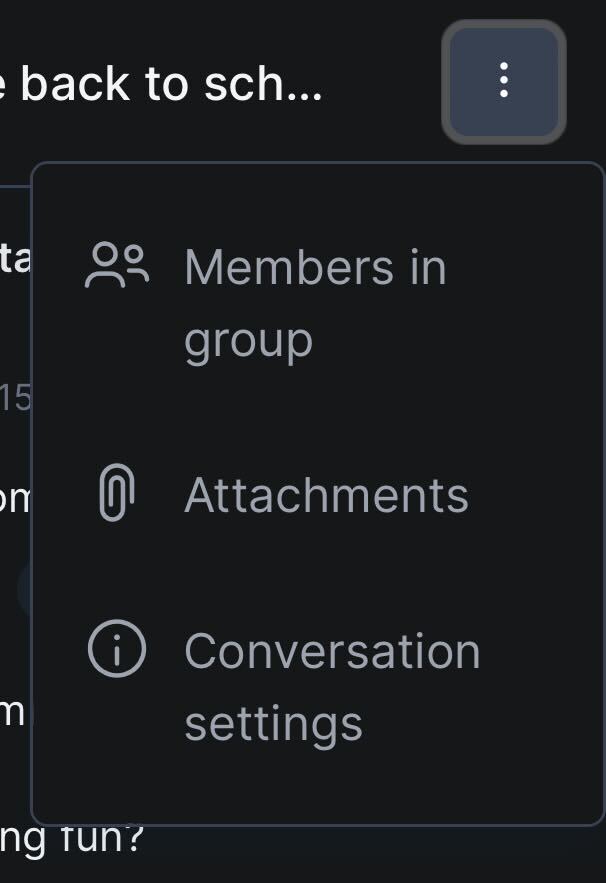
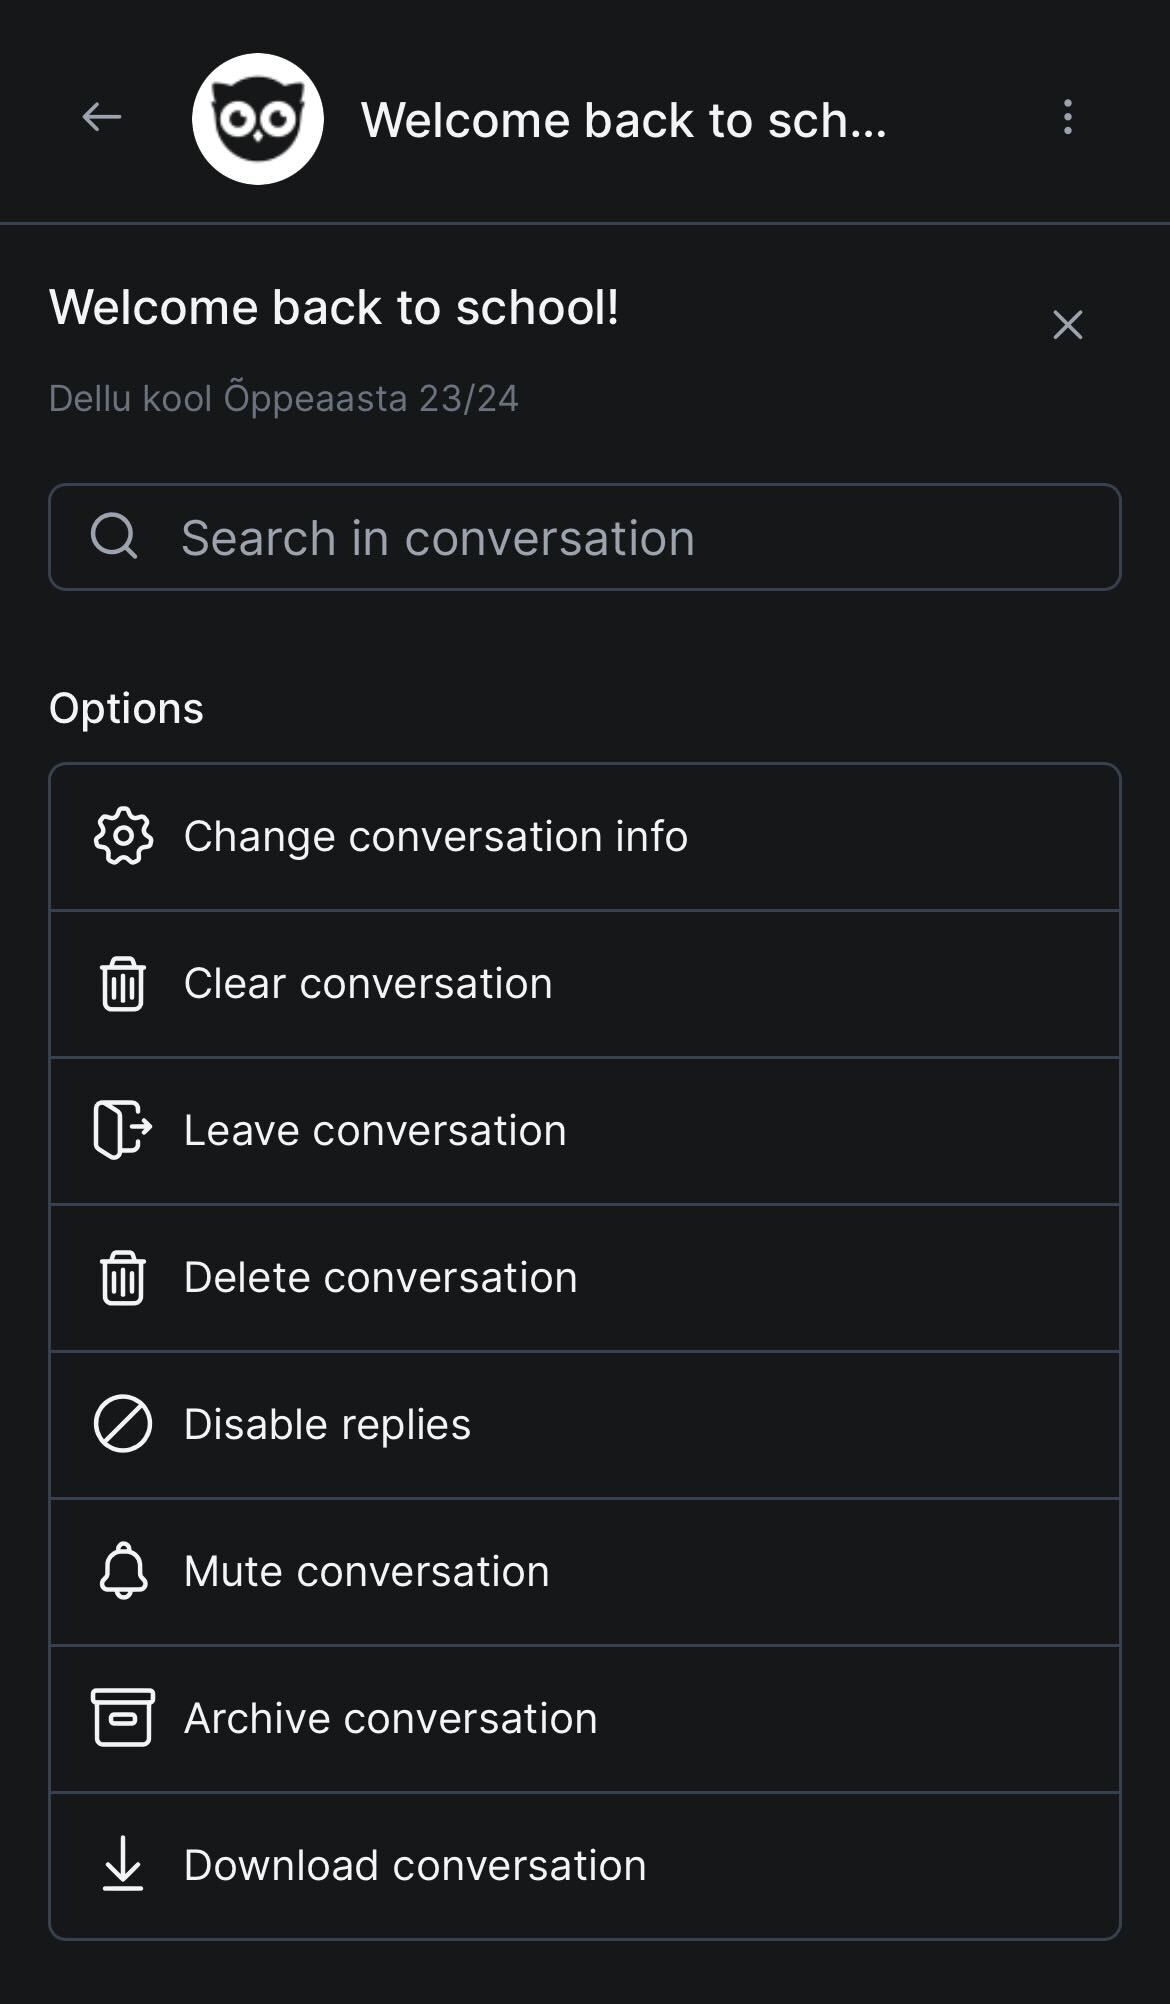
The initiator of each chat has the rights to manage it, they are the administrator of that chat. These can be accessed by clicking on the icon i Conversation settings.
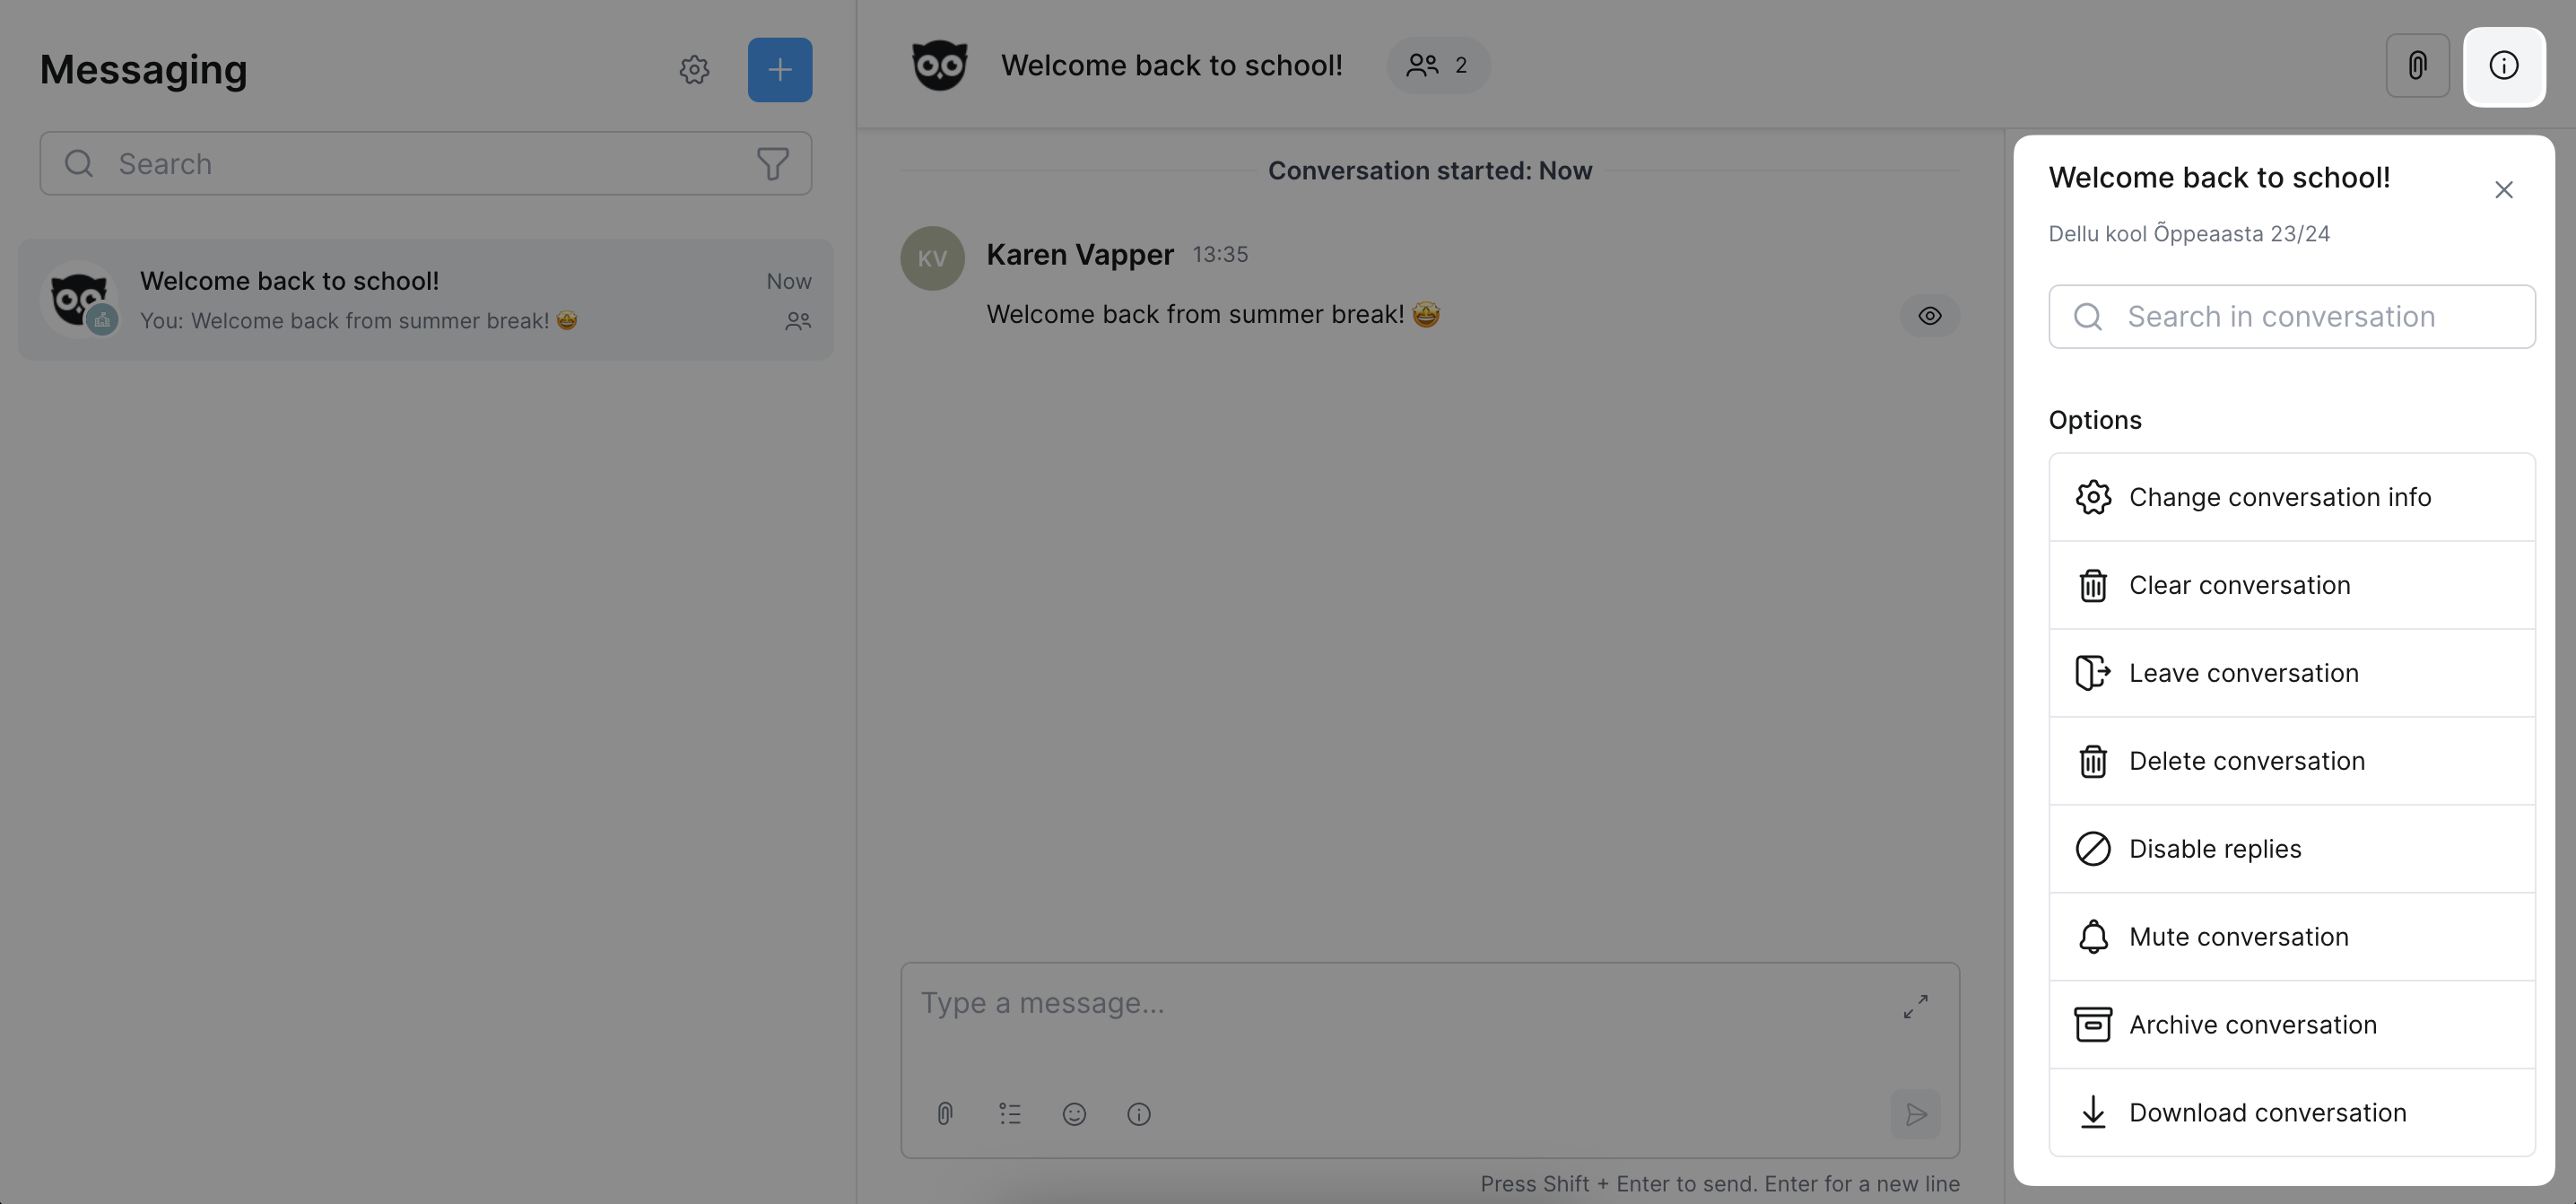
An additional window opens where you can:
- Change conversation info: as the chat initiator, you can edit and remove the attached profile picture; change the chat title.
- Clear conversation: posts in the conversation will be deleted, only for the user who chose to clear. For other participants, the posts will remain.
- Leave conversation: each participant can remove themselves from the conversation by selecting that option. If you are the last administrator of the chat, you should designate someone to replace you.
- Disable replies (allow replies): if you have mistakenly selected Message as the type for your announcement, you can change this and disable replies. And if you have mistakenly chosen Announcement as the type of conversation, you can change it back to Message.
- Mute conversation: disable notifications
- Archive conversation: transfer a conversation from active conversations to an archive, only for yourself. The conversation can be found later in the search filter. If new posts are added to the conversation, the conversation will not be removed from the archive, so you have to search for them separately.
- Download conversation: a file of the conversation is created, opened in a new browser page and can be saved.
Attachments, photos and links to the chat can be viewed by clicking on the paperclip icon. The attached files and links can be found by selecting them at the top of the page.
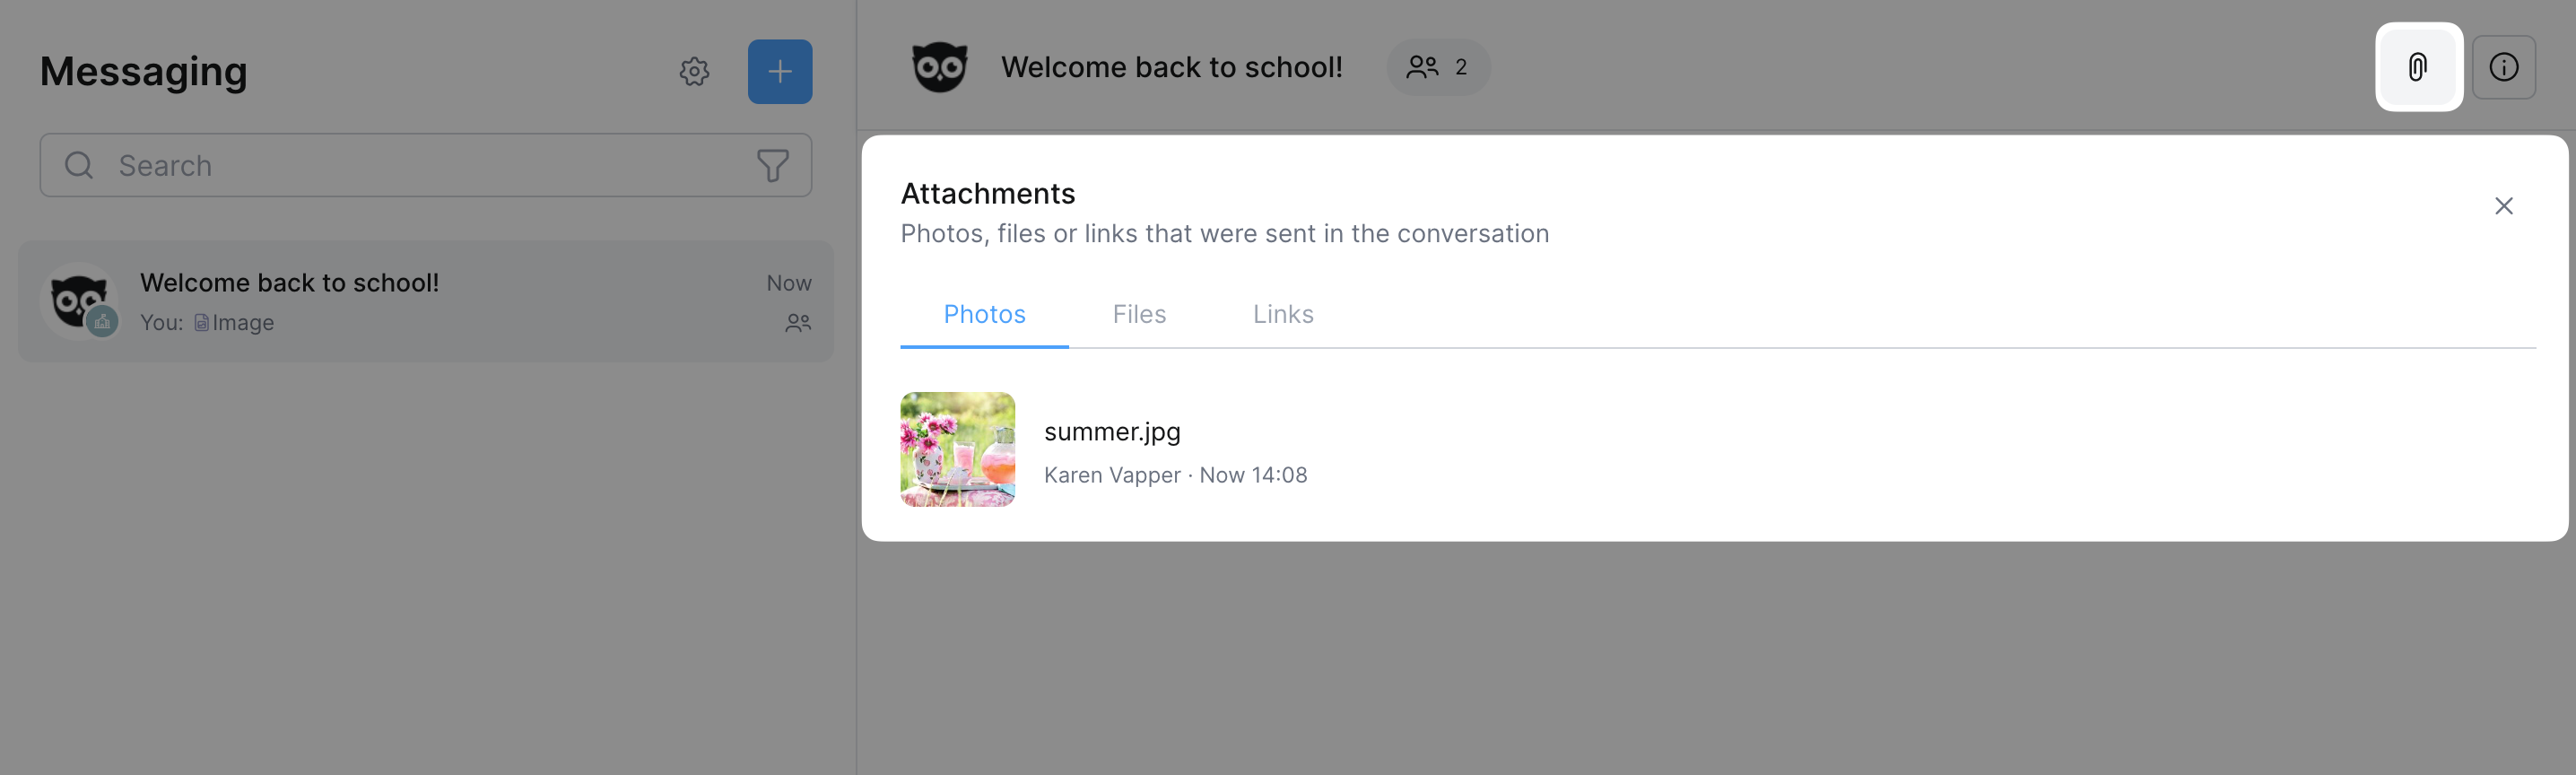
Participants in the chat can be seen and managed by clicking on the little man icon showing the number of participants.
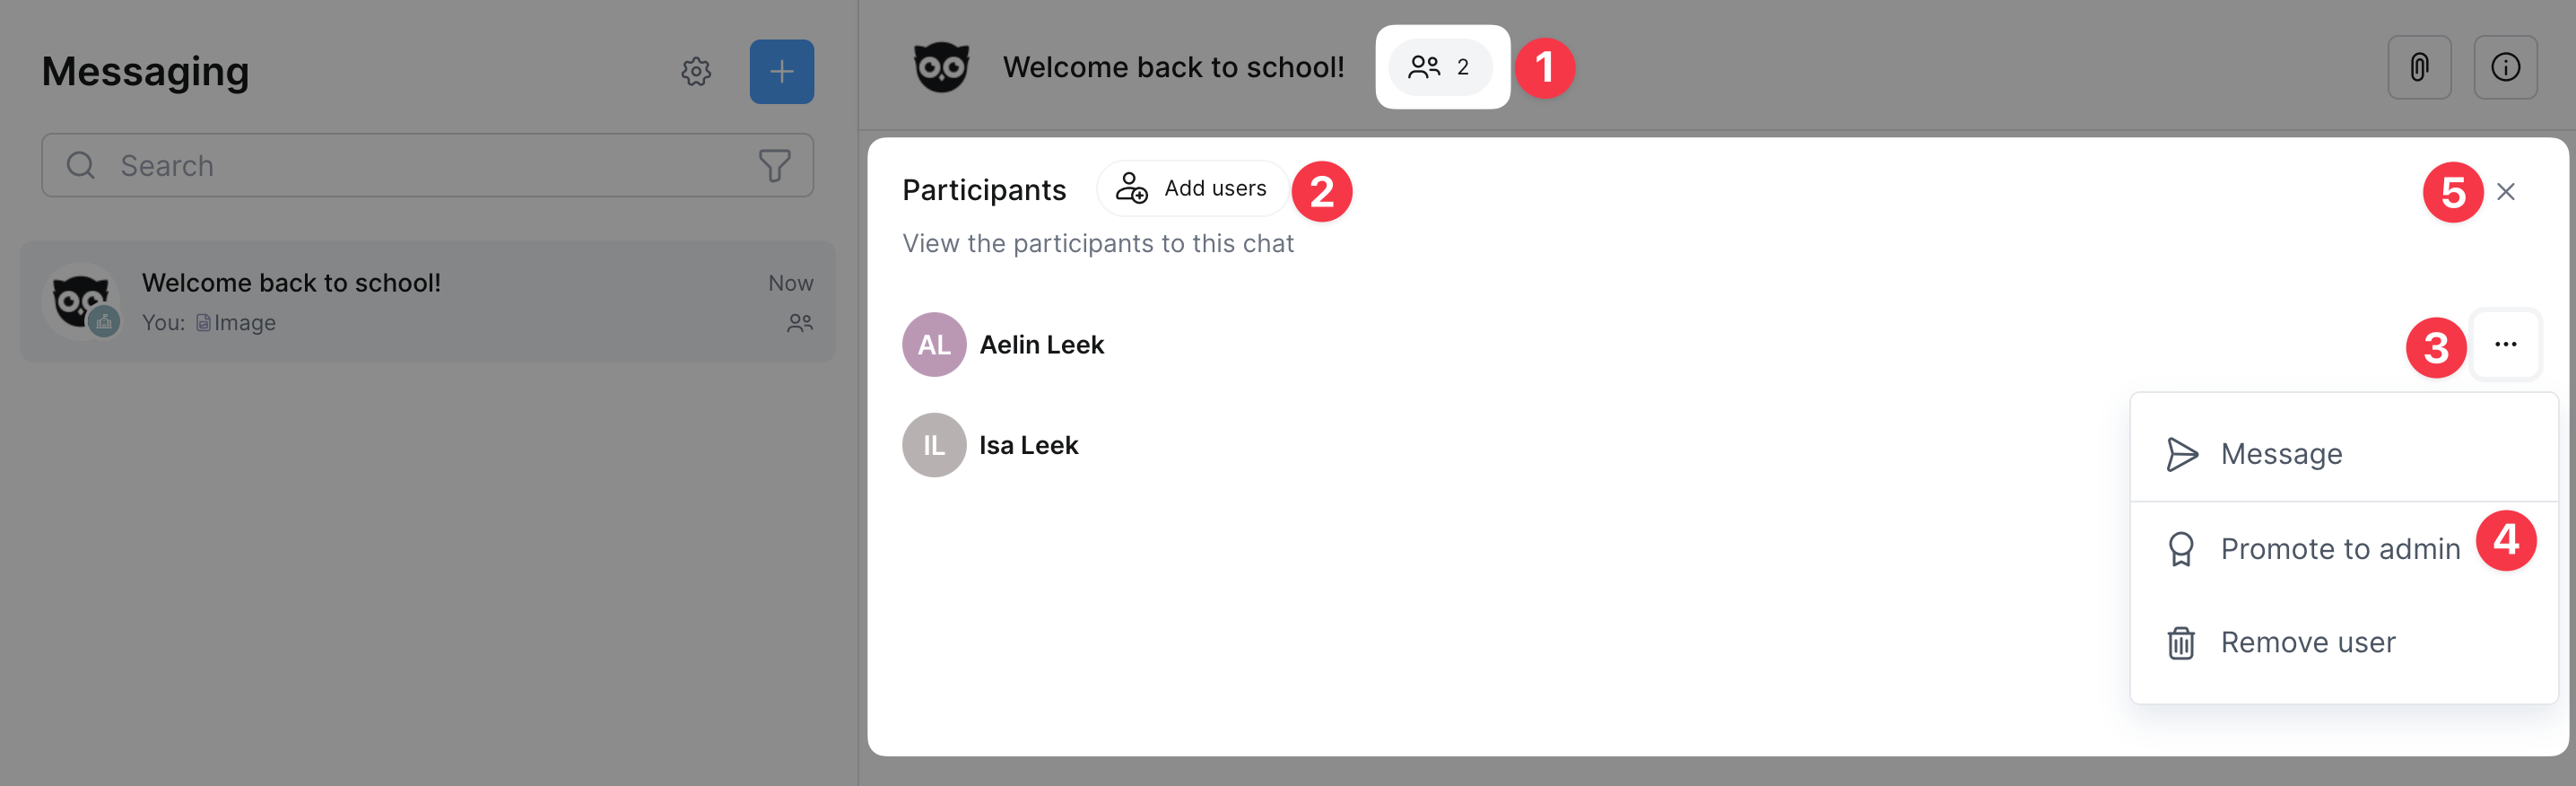
- Select the icon to manage your chat participants. The chat administrator (you) is not listed.
- Add users (only for conversations with a selection of users) - reopens the possibility to select among users. New recipients will be able to access the add to subsequent posts. All participants in the conversation will receive a corresponding note on the conversation timeline.
- Open the additional menu to manage the chat participants
- From the additional menu you can:
- send the participant a private message
- give the participant the right to manage this chat (add him/her as administrator of this chat). Adding administrators is only possible for messages, announcements do not have administrators.
- remove the user from the conversation
- Close participant management menu
Adding a message to a conversation
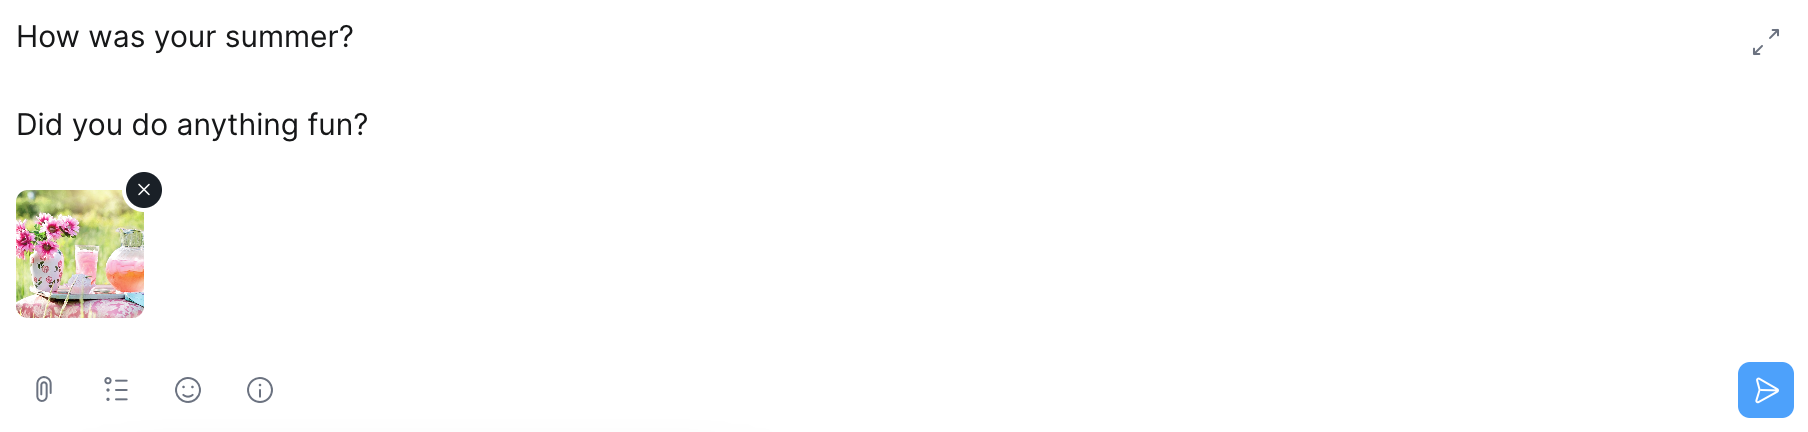
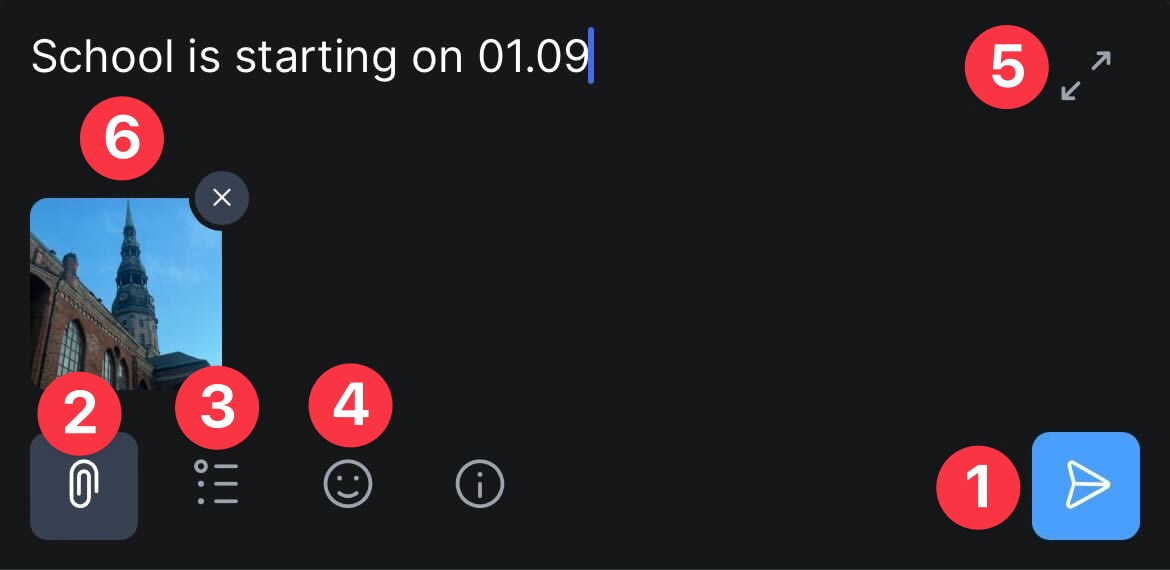
The window to add a new message gives you the following options:

- Send message (publish)
- Upload a file
- Add a poll to your message (Basic package service, read more in the article "Polls in conversations")
- Add Emoji's to your message
- Enlarge the message entry window to the full size of the Conversation window
Attention!
Whether pressing the Enter key adds a new line to the post or publishes it depends on the user's settings. To change it, open the Settings by clicking the gearwheel icon above the list of conversations.
Adding a file to your post opens the file window to add files from you computer to the message. Selected files are then displayed after you message.
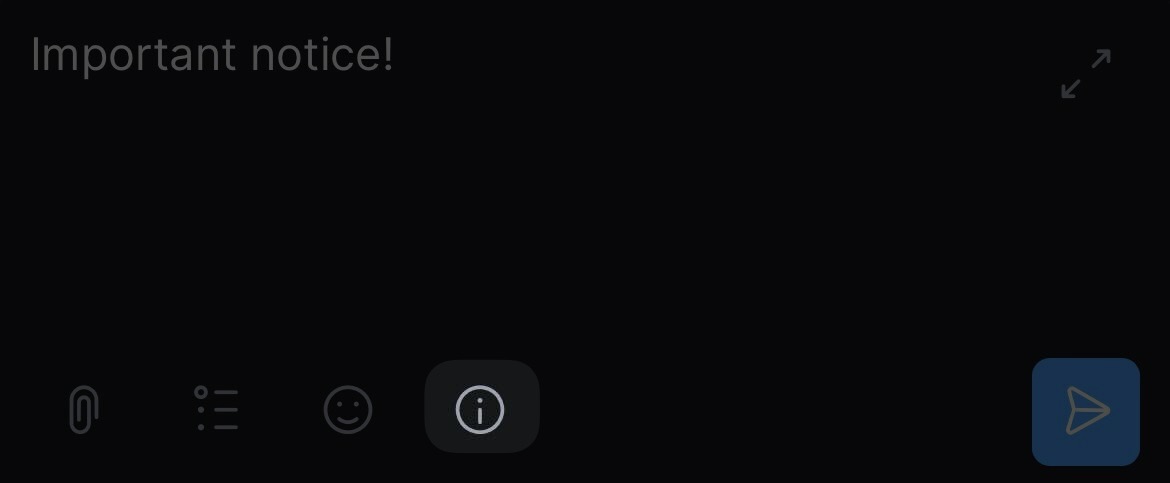
Sending vital information
Attention!
The school administration can send an "Important Notice!" to all eKool users in the school.
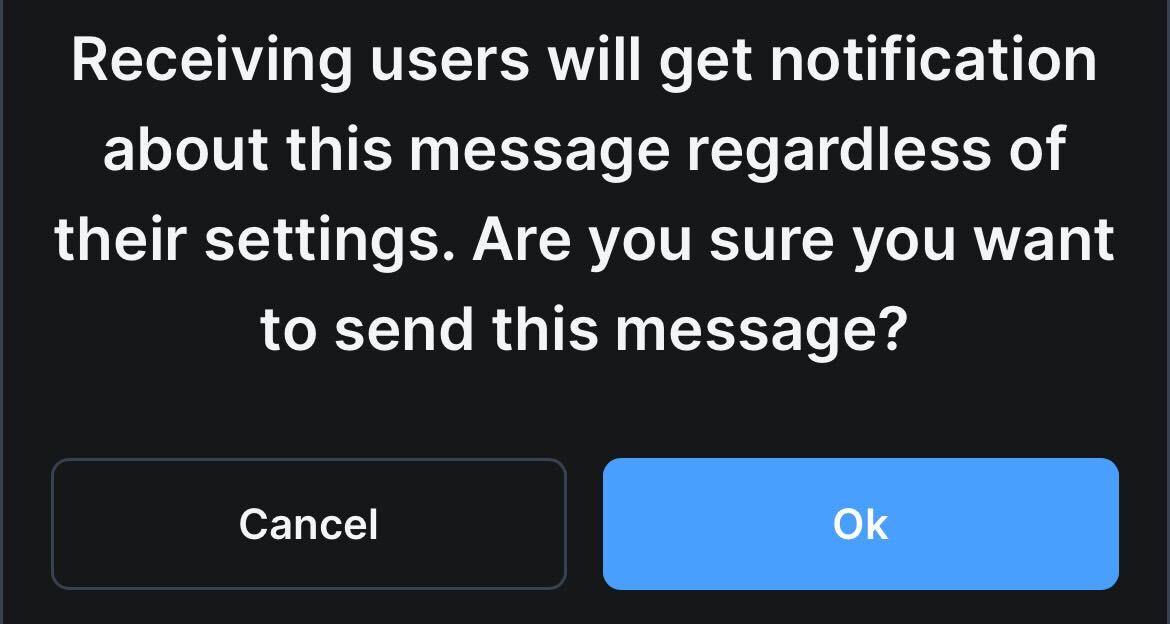
To do this, enter a message in the text field and press the exclamation mark before sending. The exclamation mark in the text field will change colour.

A warning message is displayed:
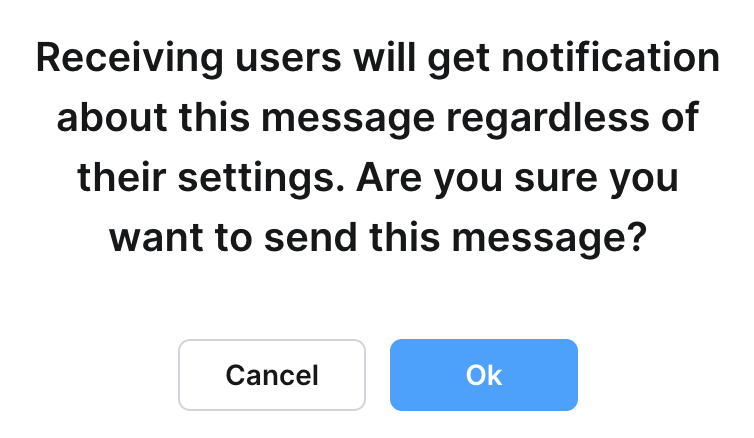
If eKool users have set in their conversations settings not to receive notification emails from unread messages in their email inbox - the conversation/notification will be sent to the user's inbox.
By pressing the "Ok" button and "Send Message", the message will be forwarded to all the people selected in the contacts.
Managing your message information
There are special options for messages you have sent yourself, and you can find a wide range of information and management options.
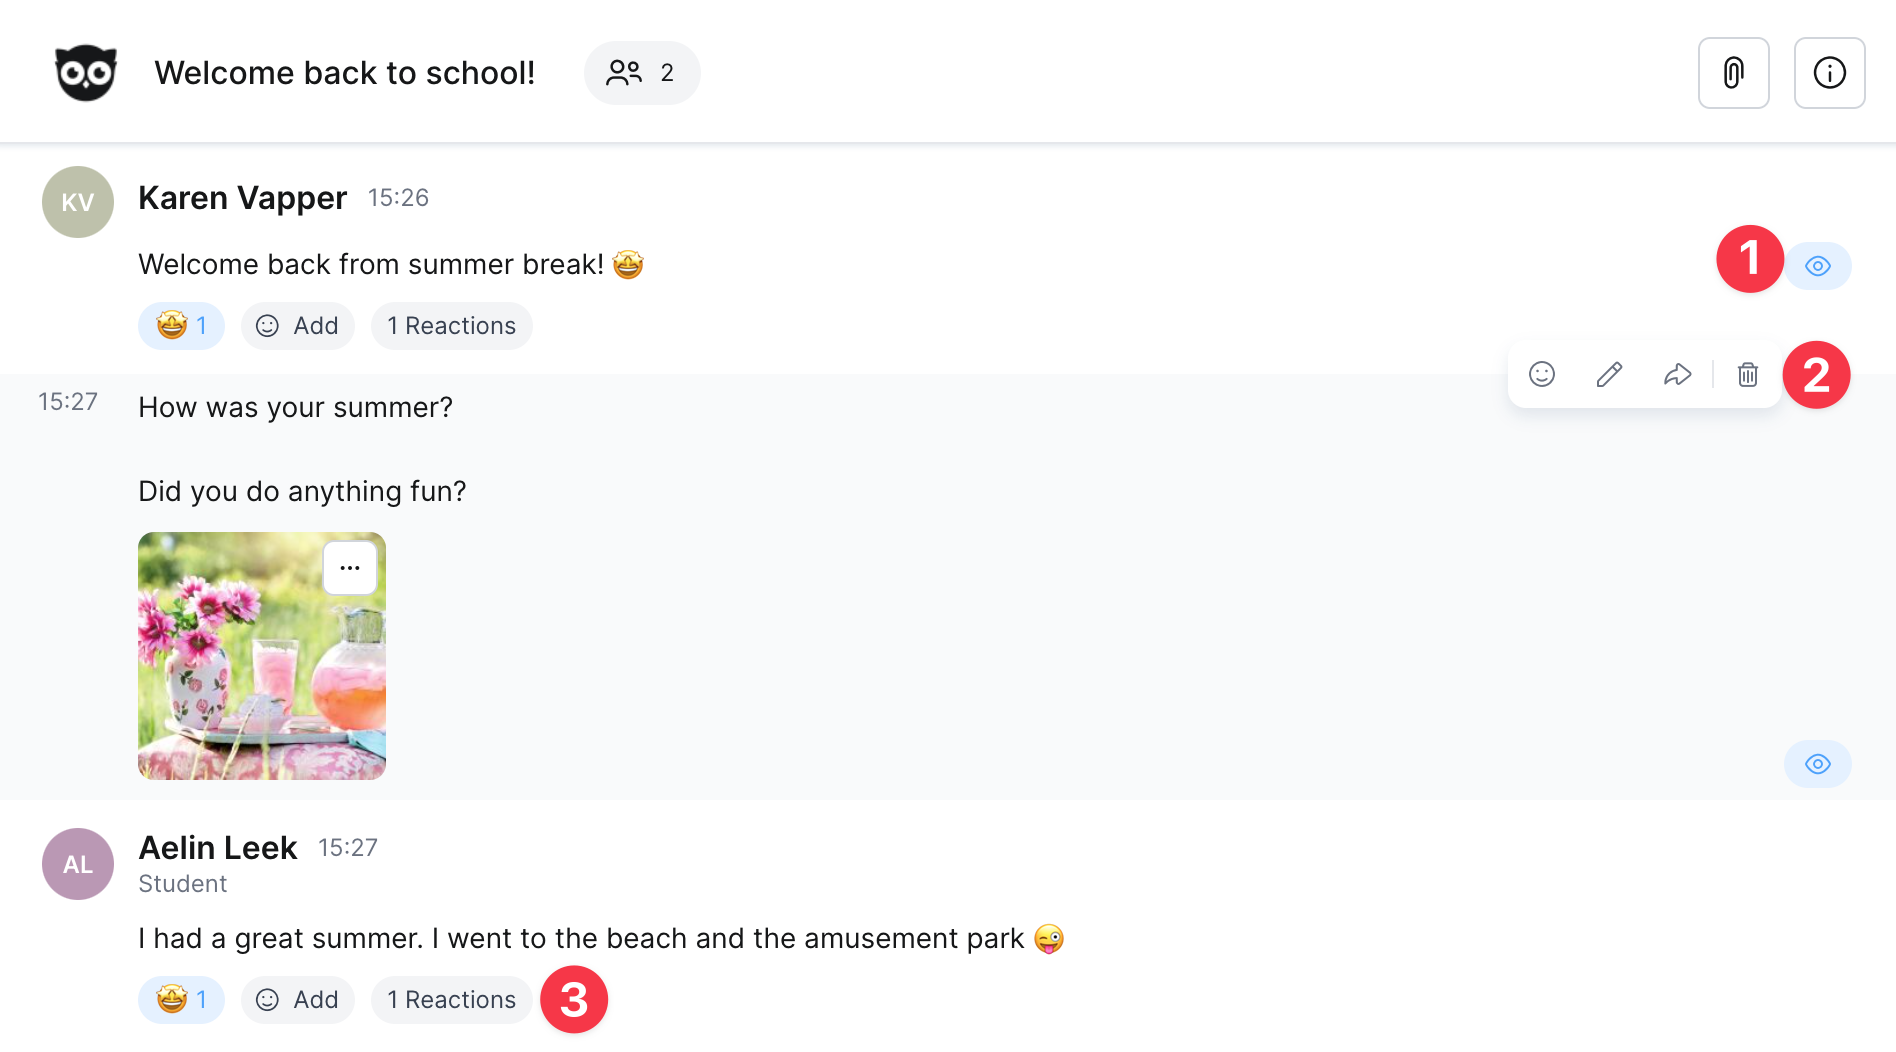
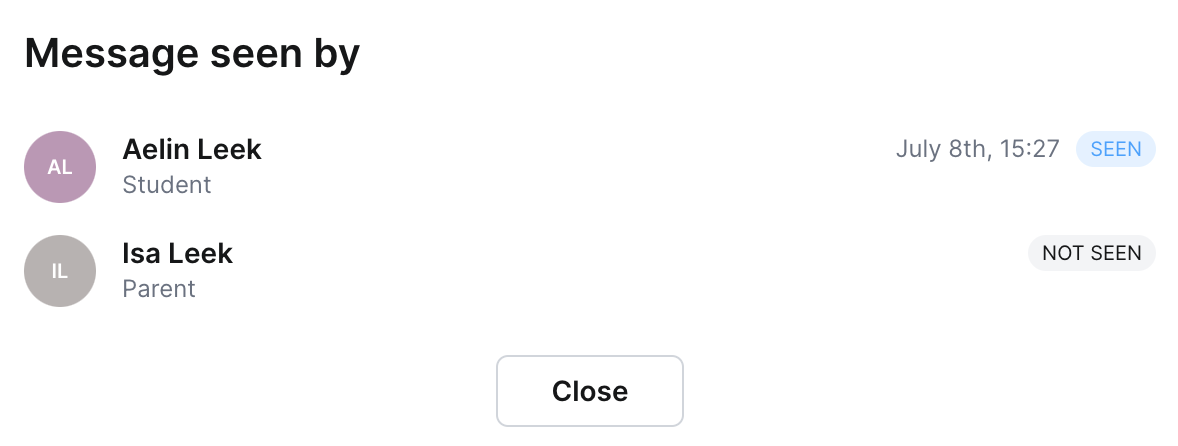
- A list of conversation participants who have and have not yet seen the message you sent. Only the author of the message can see the list.
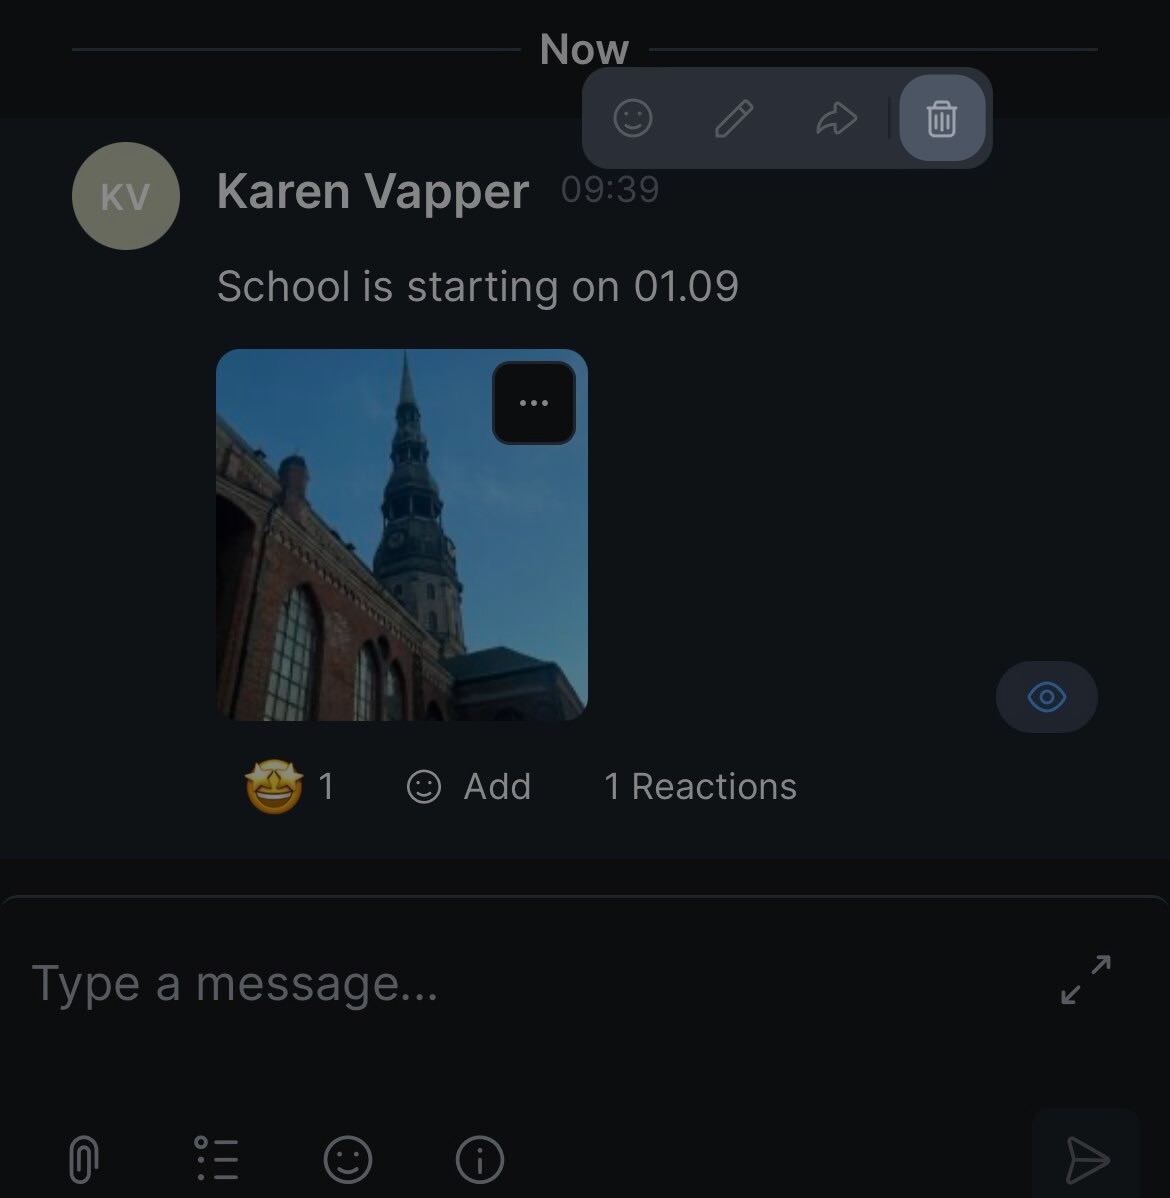
- Hovering over the post will open an additional menu for message management:
- Emoticon icon opens an additional window for their selection
- The pencil icon gives you the chance to change your message. Message viewers do not have this icon. The change will be shown immediately to the message recipients; it will be accompanied by an indication that a change has been made and when it was made. There is no time limit for changing your message.
- The arrow icon allows you to forward the message.
- The trashbin icon allows you to delete the message. More info about deletion in the next section.
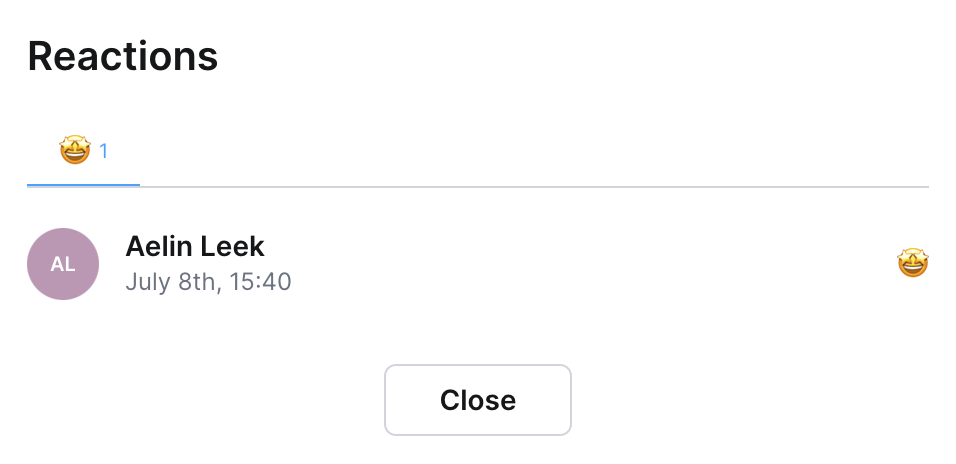
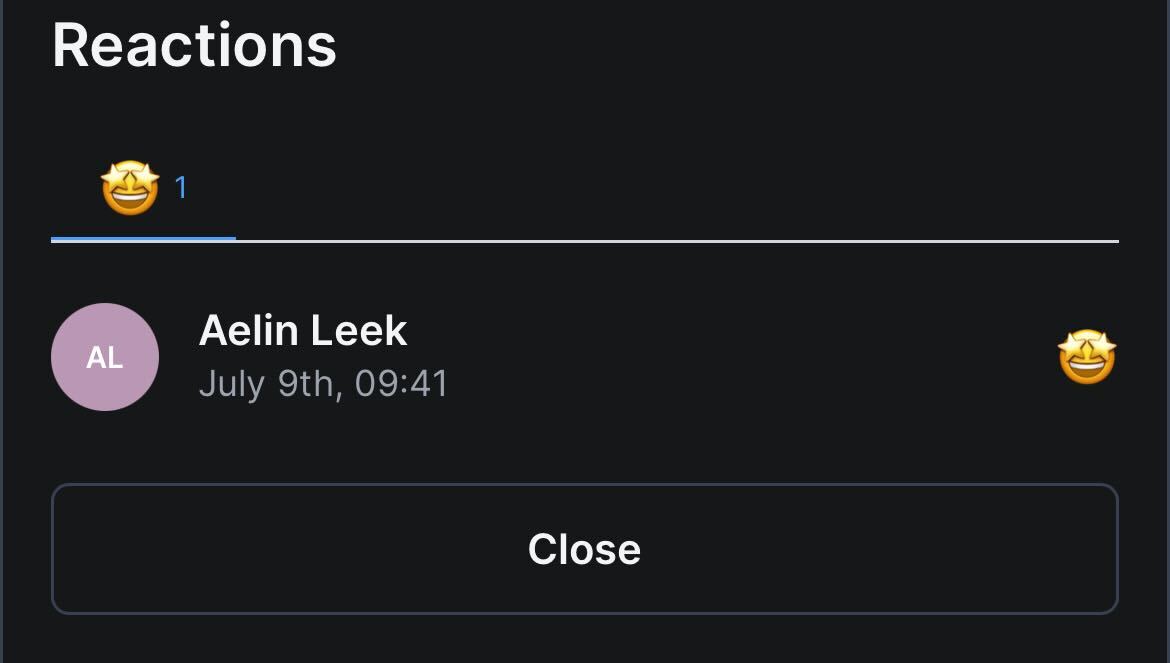
- The feedback menu shows feedback given with emoticons. Clicking on the last button, Feedback, will open an additional window where you can see who added what.
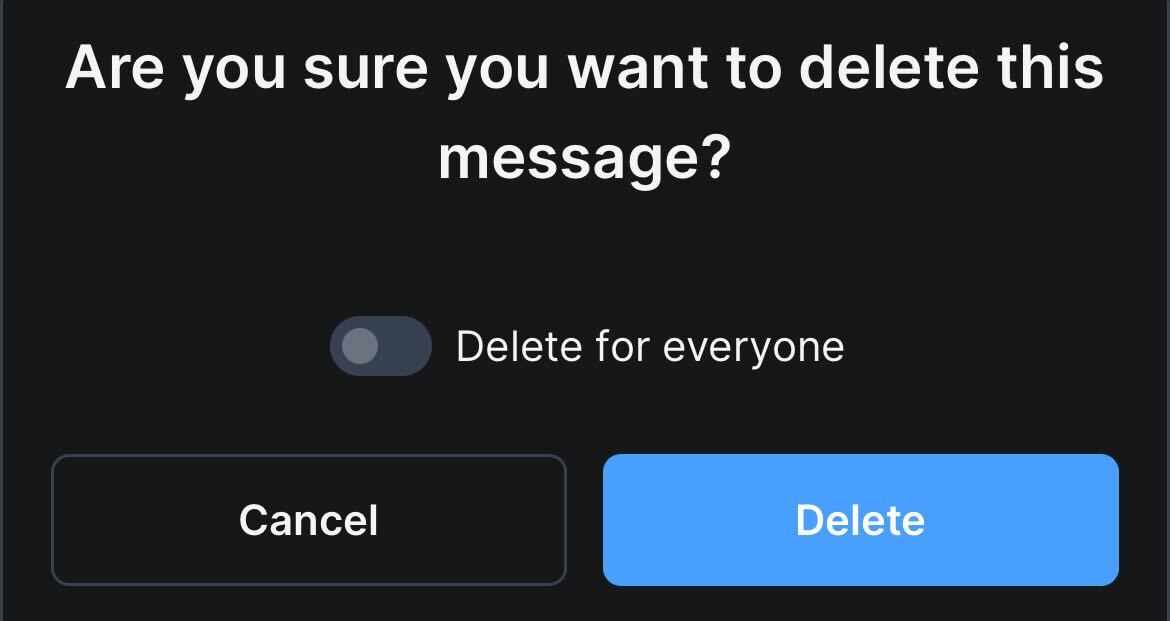
Deleting a message
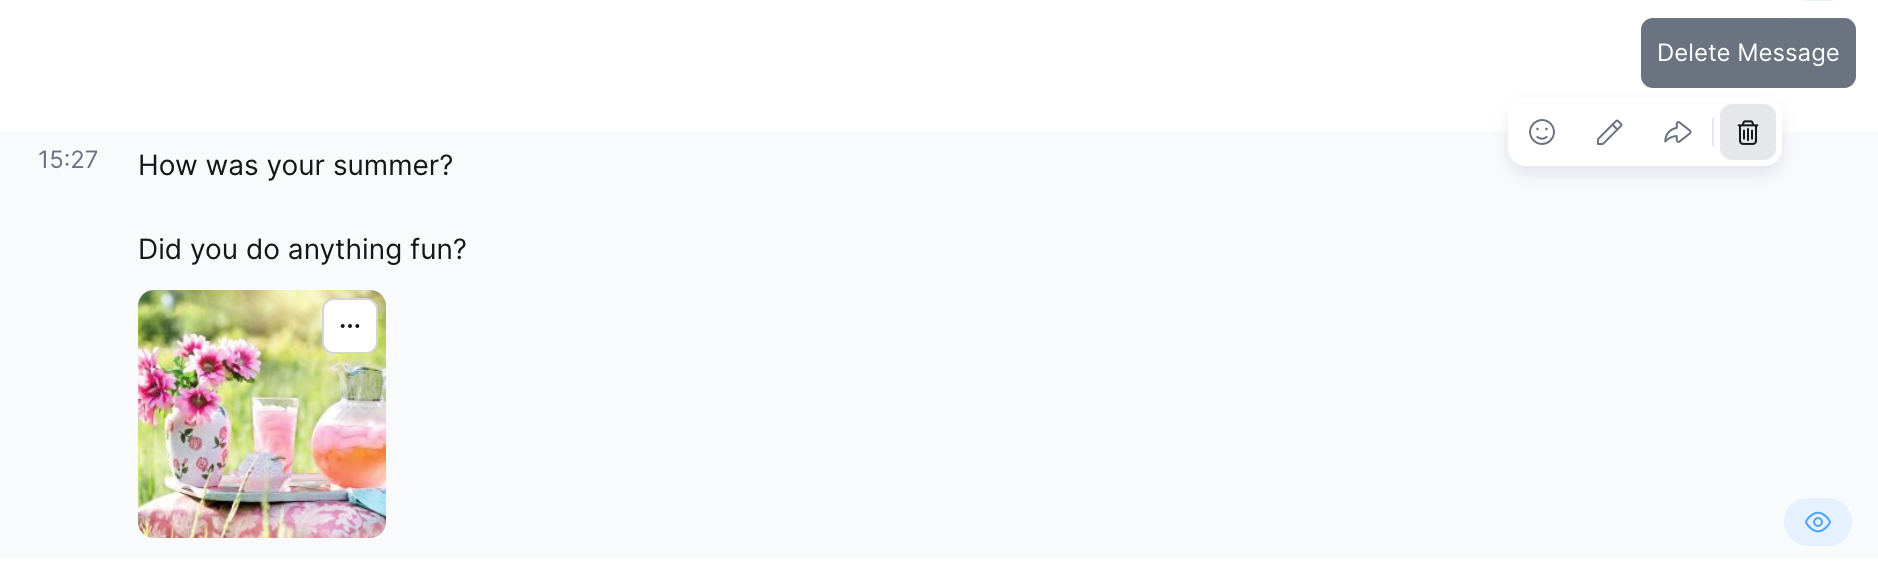
- Hover over the message area to bring up an additional message menu
- Choose Delete message (trashbin icon)
- Select one of the actions from the additional form
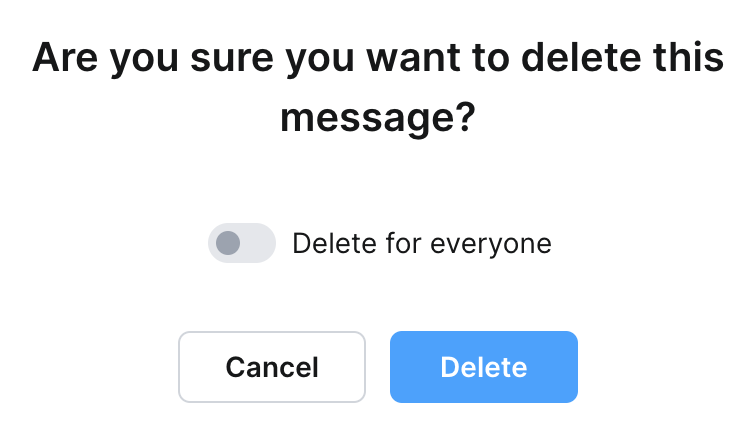
The deleted message will remain in the conversation as ' This message has been deleted'.
Good to know!
You can delete your own message for everyone within 24 hours of adding it.
Deleting other messages works in a similar way, but deleting messages does not give you the option to Delete for everyone.
App
Adding a new conversation or announcement
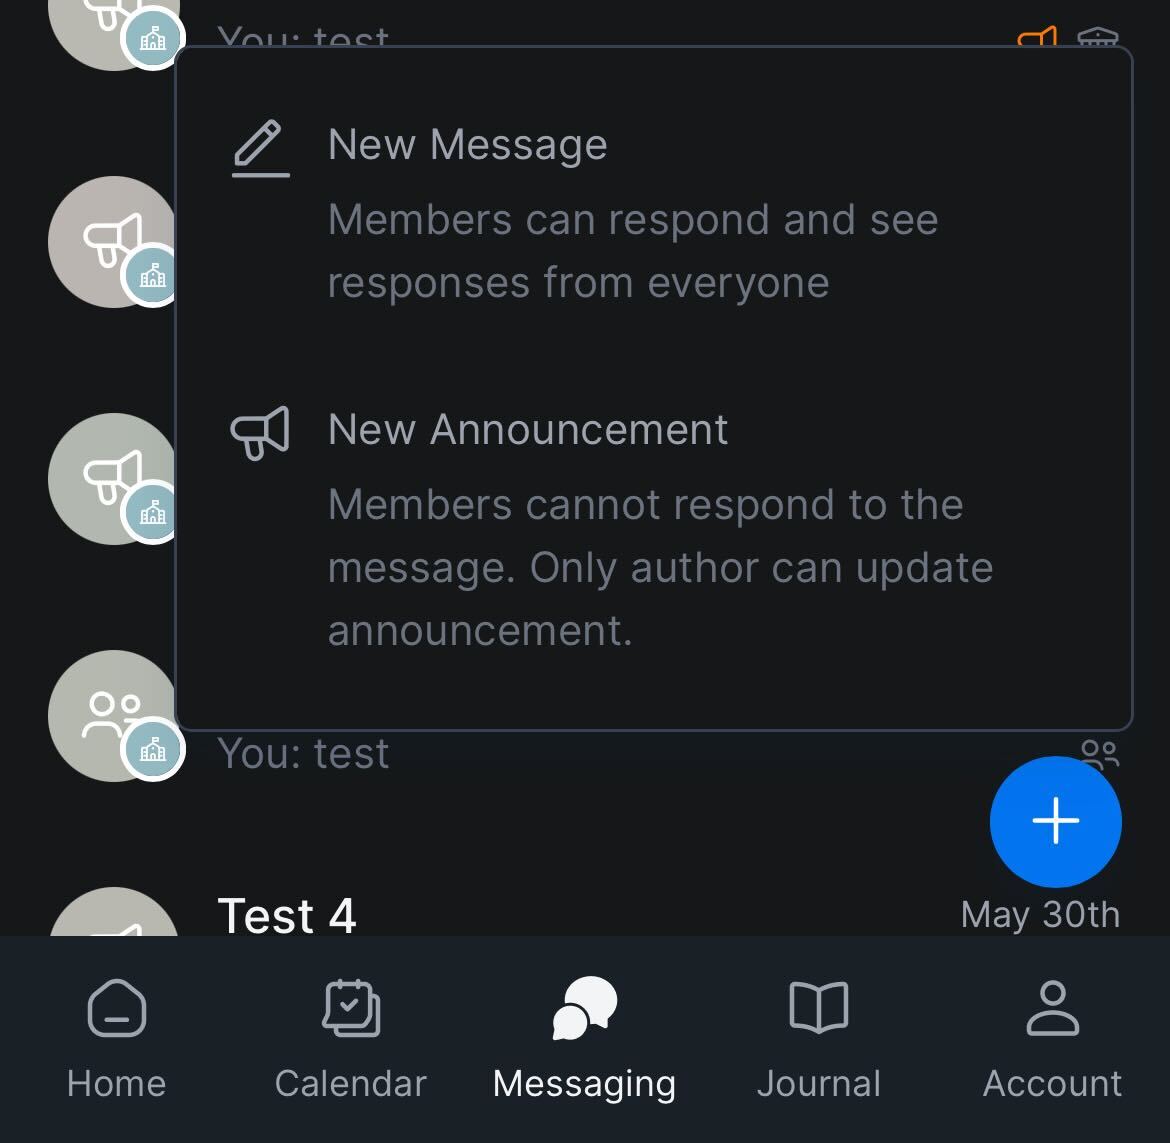
- Start a new conversation or announcement by pressing the + (plus) sign in the list of conversations.
- Select the type of conversation - new conversation; new announcement.
- The form for selecting the addressees of the conversation opens.
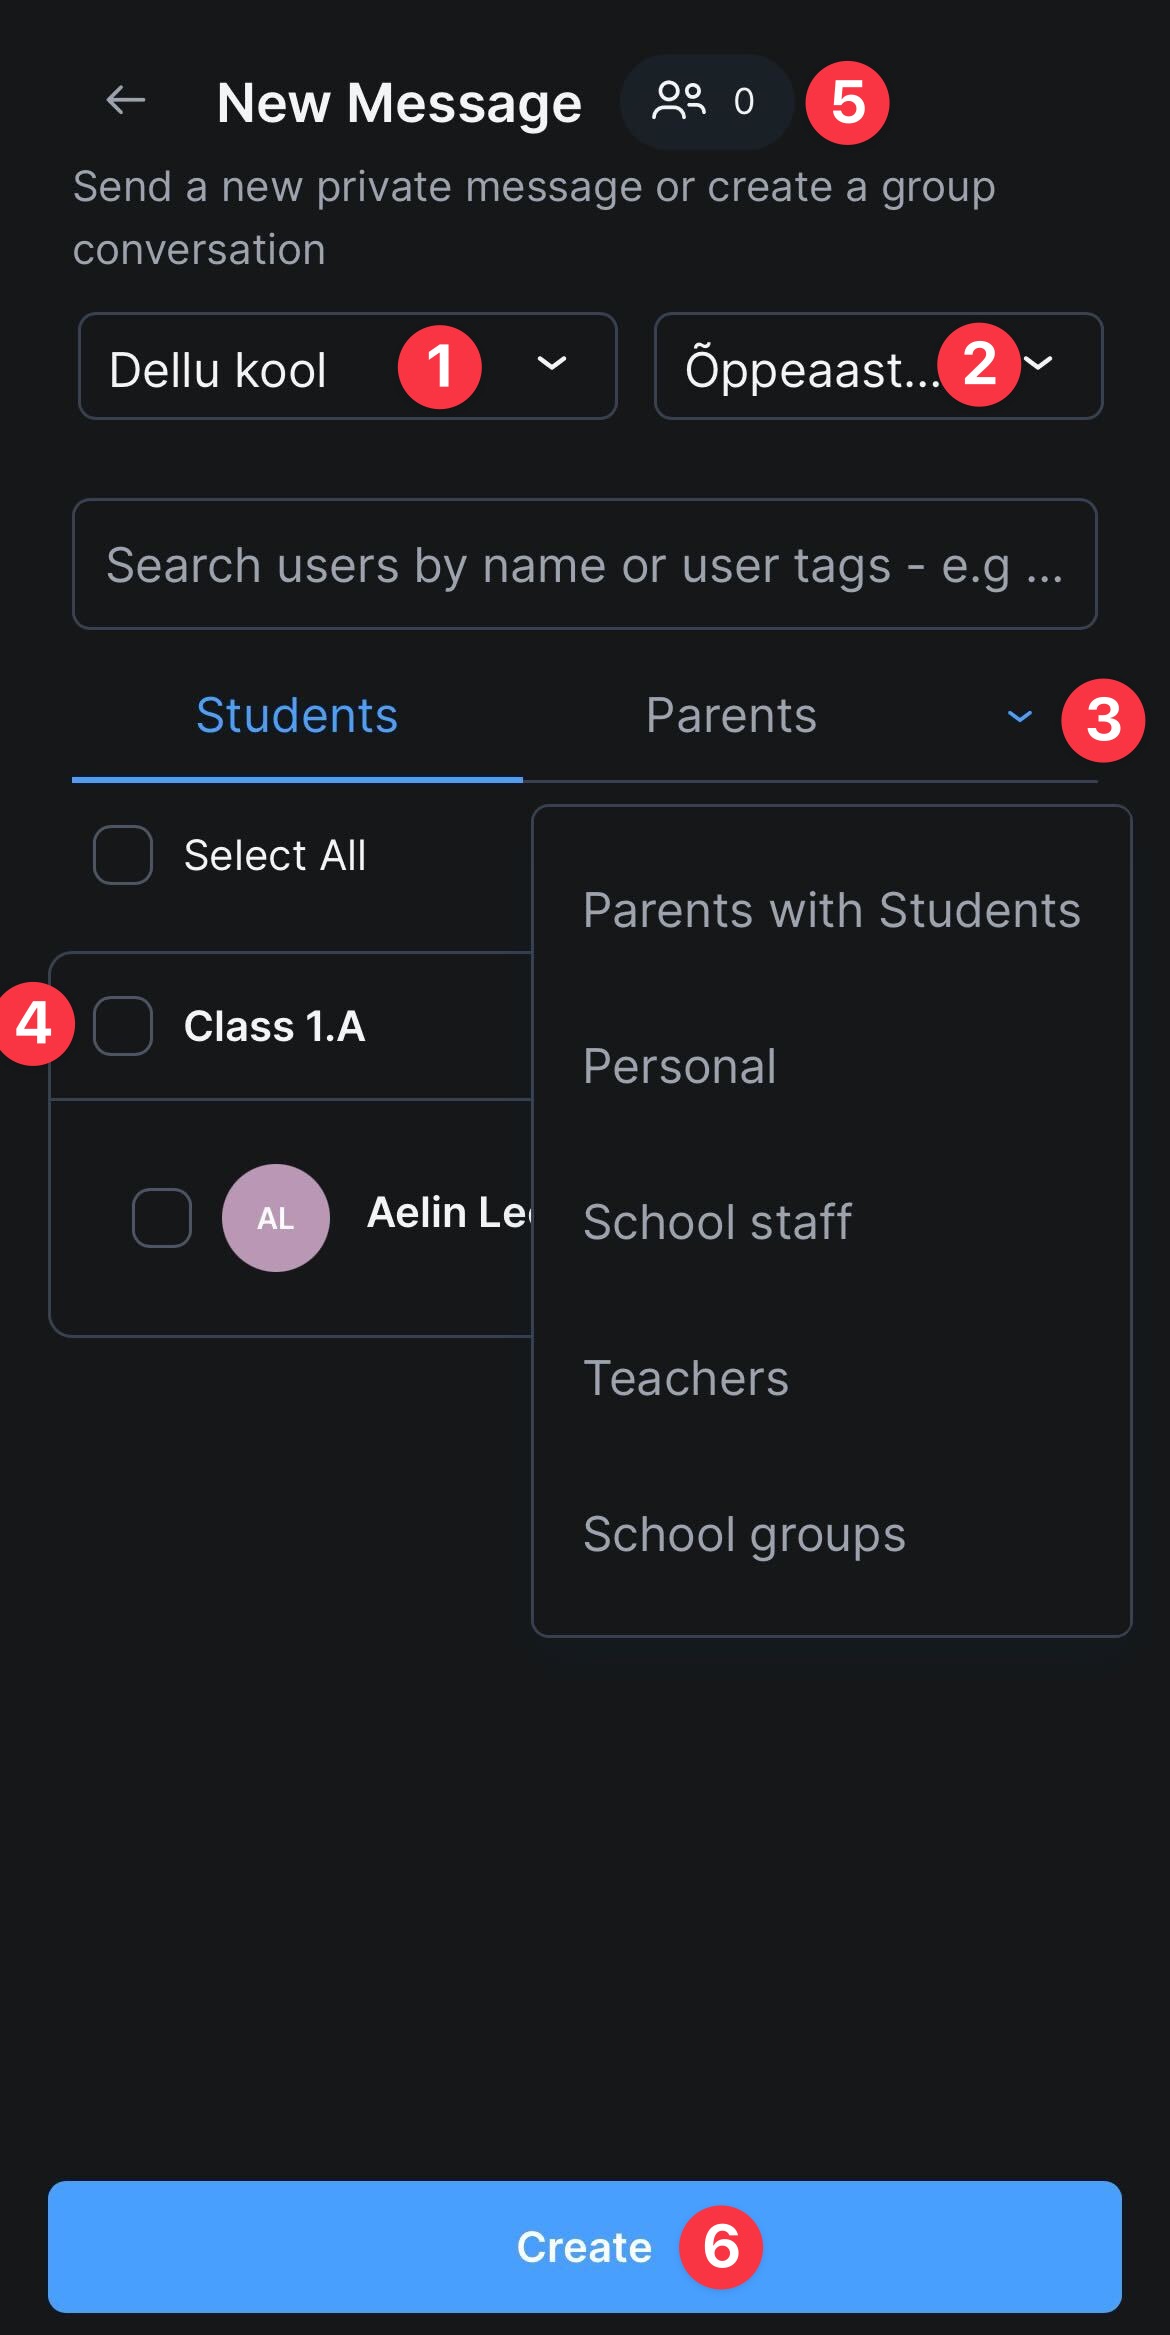
- Select school (if the user attends more than one school; the user's children attend more than one school; the user works in more than one school).
- Select the school year (the labelling depends on the school you have selected). The currently valid school year is always selected. The choice of the school year is only necessary if you want to open conversations with recipients who were contacted in previous school years.
- Choose how you want to find the recipients (For more information, see the article - "Contacts in conversations"):
- select from the groups Students, Parents, School staff, Teachers, Personal if you want to make a selection by name (to see who is participating in the chat when making a selection) and search for users.
- Select School Groups to start a conversation with role-based, automatically managed groups. The options vary depending on the role.
- Make a selection from the list of groups for one or more recipients.
- You can see the number of groups you have selected (if you have selected school groups) or the number of recipients (if you have selected from groups) at the top of the form to add a new conversation.
- To start a new conversation, click Create.
Good to know!
Only students/parents who have an eKool account will be in the chat contacts!
The next step opens a form to add information to your conversation or announcement to make it easier to find.
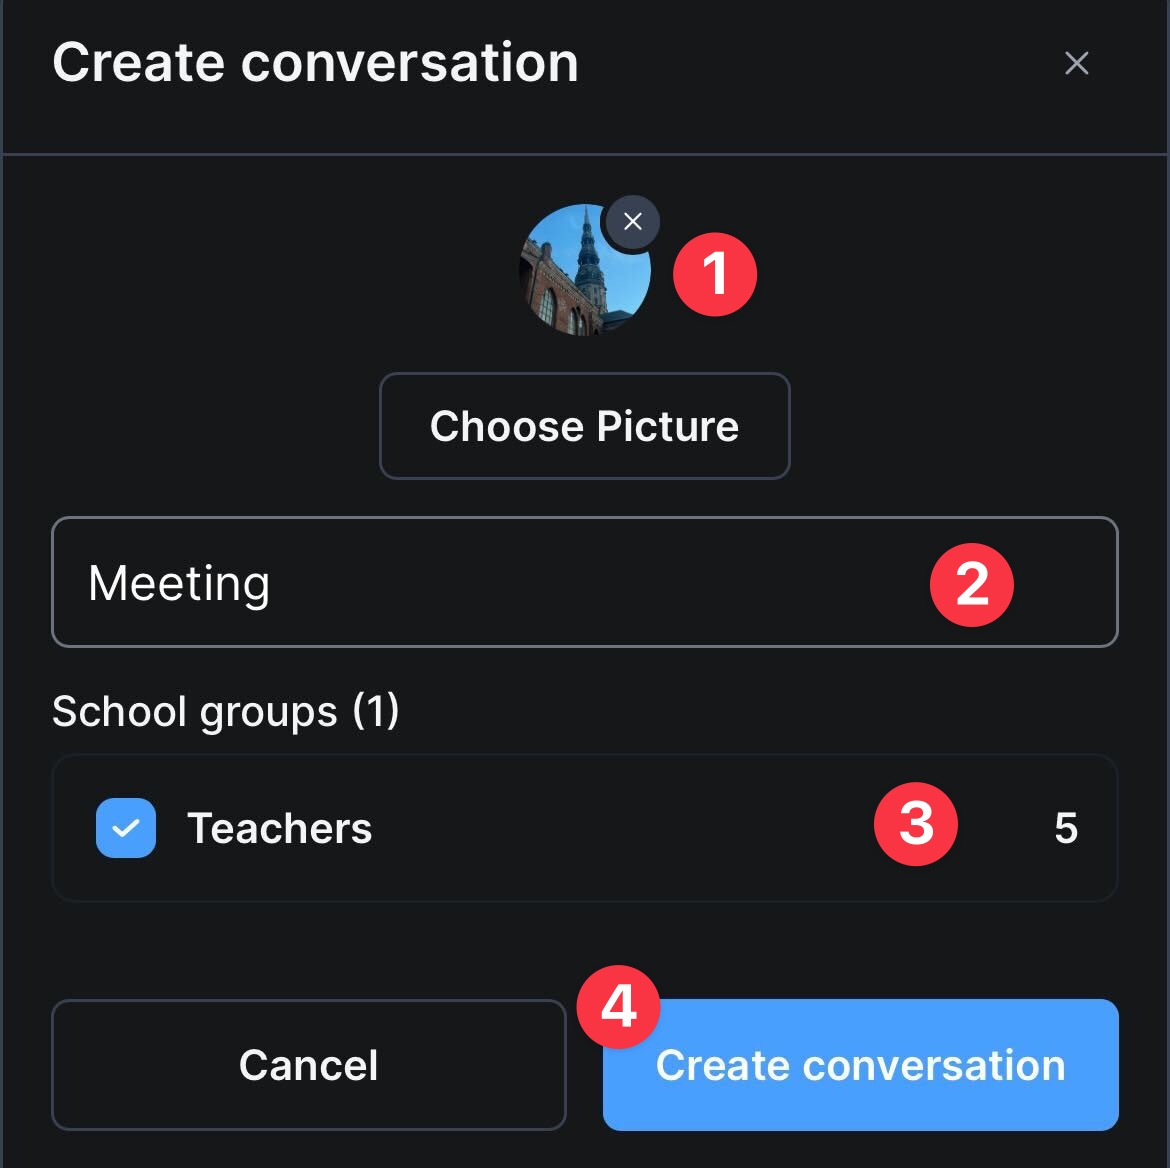
- Add a (representative) picture to the conversation (if you wish).
- Add the title of the conversation (required). The title must not exceed 50 characters.
- It is also possible to change the selection of participants, to exclude some people or groups from the conversation. There is no more possibility to add participants.
- Click Create conversation, a new conversation will be added.
A blank chat form opens, where you can enter your first message.
Managing your conversations
Attachments, photos and links to the chat can be viewed by clicking on the paperclip icon. The attached files and links can be found by selecting them at the top of the page. You can also find the Recipients and Chat settings.
The initiator of each chat has the rights to manage it, he is the administrator of that chat. These can be accessed by clicking on the icon i Conversation settings.
An additional window opens where you can:
- Change conversation info: as the conversation initiator, you can edit and remove the attached profile picture; edit the chat title.
- Clear conversation: posts in the conversation will be deleted, only for the user who chose to clear. For other participants, the posts will remain.
- Leave conversation: each participant can remove themselves from the chat by selecting the user option. If you are the last administrator of the chat, you should designate someone to replace you.
- Disable replies (allow replies): if you have mistakenly selected Conversation as the type for your message, you can change this and disable replies. And if you have mistakenly chosen Announcementat as the type of conversation, you can change it back to Conversation.
- Mute conversation: disable notifications
- Archive conversation: transfer a conversation from active conversations to an archive, only for your own user. The conversation can be found later by using the search filter. If new posts are added to the conversation, the conversation will not be removed from the archive, so you have to search for them separately.
- Dowload conversation as a PDF file: a file of the conversation is created, opened in a new browser page and can be saved.
Attachments, photos and links to the chat can be viewed by clicking on the paperclip icon. The attached files and links can be found by selecting them at the top of the page.

- Add users (only for conversations with a selection of participants) - reopens the possibility to make a selection of participants. New recipients will be able to access the add to subsequent posts. All participants in the conversation will receive a corresponding note on the conversation timeline.
- Open the additional menu for managing the chat participant
- From the additional menu you can:
- send the user a private message
- give the user the right to manage this chat (add them as an administrator of this chat). Adding administrators is only possible for chats, announcements do not have administrators.
- remove the user from the conversation
- Close user management form
Adding a message in a conversation
The window to add a new message gives you the following options:
- Send message (publish)
- Add an attachment to your message
- Add a vote to the message (Basic package service, read more in the article "Polls in conversations")
- Add emoticons to your message
- Enlarge the message entry window to the full size of the conversation window.
- Remove attachment from message
Attention!
Whether pressing the Enter key adds a new line to the post or publishes it depends on the user's Conversations settings. To change it, open the Settings by clicking the gearwheel icon above the list of conversations.
Sending vital information
Attention!
The school administration can send an "Important Notice!" to all eKool users in the school.
To do this, enter a message in the text field and press the exclamation mark before sending. The exclamation mark in the text field will change colour.
A warning message is displayed:
Namely, if eKool users have set in their conversation settings not to receive notification emails from unread messages in their email inbox - the given conversation/notification will be sent to the user's inbox.
By pressing the "Ok" button and "Send Message To", the message will be forwarded to all the people selected in the contacts.
Managing your message information
There are special permissions for messages you have sent yourself, and you can find a wide range of information and management options at the post.
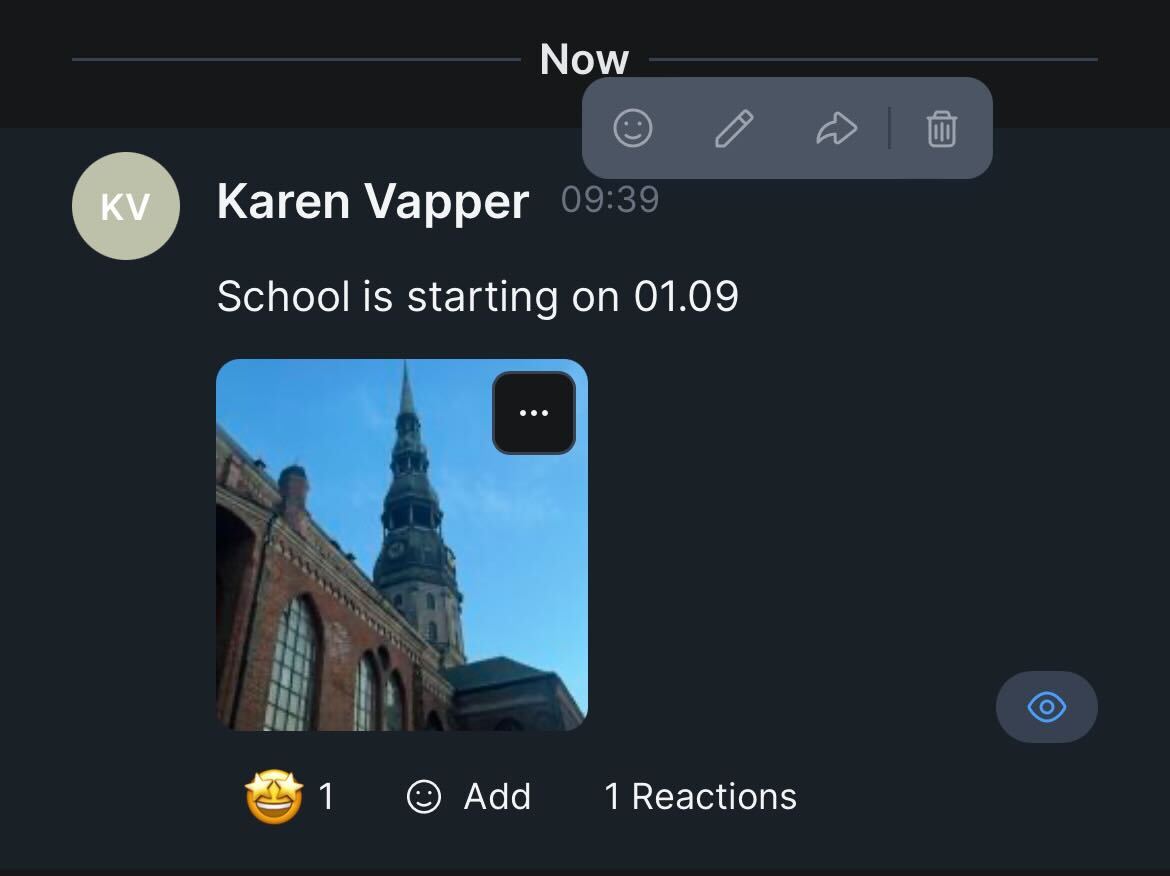
- Eye icon - shows who has seen and who has not yet seen the message
- Emoticon (Add) - lets you add reactions to a message
- Pencil icon - allows you to make changes to the message. The change will be sent immediately to the recipients of the message; it will be accompanied by an indication that a change has been made and when it was made. There is no time limit for editing your message.
- Arrow icon - Allows a message to be forwarded
- Trashbin icon - allows you to delete a message. More on deleting in the next section.
- Reaction(s ) - indicates who has reacted to the message.
Deleting messages
- Click on the message area.
- Select Delete message (trashbin icon).
- Select one of the actions from the additional form
The deleted message will remain in the conversation as ' This message has been deleted'.
Good to know!
You can delete your own message for everyone within 24 hours of adding it.
Deleting other messages works in a similar way, but deleting other users messages does not give you the option to Delete for everyone.